Posts

Showing posts from March, 2021

Raspbian Enable Remote Desktop

Image
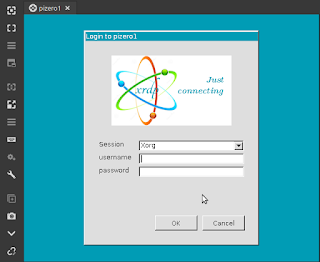
Remote desktop is not enabled by default on Raspbian for security reasons / people not changing the default password...naughty naughty. It does have RealVNC bulit in but it is not very good and requires RealVNC to be installed on your local machine as well, it is also not compatible with TightVnc etc. XRDP is a lot nicer in my opinion and seems to be a lot faster on a PiZero. To enable, SSH in to your Pi, and run "sudo apt install xrdp". You can now use the windows build in "Remote Desktop" application to connect to your Pi. If using linux i really like Remmina that supports VNC and XRDP. Log on using your credentials, default username is pi and default password is raspberry. Change your password from the terminal with "passwd" or if it is the first time you are accessing the desktop you can do it in the wizard.

Pi GPIO Connect an LED

Image
Connecting an LED to a GPIO and turning it on is probably one of the most simple things that we can use the Pi GPIO for. There is however a bit of thought that needs to go in to it so that we do not damage anything.   We will need the following : Pi with a GPIO LED 220ohm Resistor(red, red, black, black or any larger up to ~1k) Jumper wires Strictly speaking we should calculate the correct value for the resistor but 220ohm or above will be fine for both 3.3v RPi GPIO output and 5v if required. I have chosen GPIO21 (Pin40) as the output and the resistor is in series with the LED. The short leg of the LED goes towards ground.     Create a new python script "nano led.py" import RPi.GPIO as GPIO import time GPIO.setmode(GPIO.BCM) #Board is Physical pin 1-40, BCM is GPIO NN GPIO.setup(21, GPIO.OUT) #Sets GPIO 21 to output mode GPIO.output(21, GPIO.HIGH) #Sets GPIO 21 High +3.3v time.sleep(5) #Sleep / Wait for 5 seconds GPIO.output(21, GPIO.LOW) #Sets GPIO 21 Low 0v GPIO.cleanup()

KiCad Raspberry Pi GPIO Symbols

Image
There does not appear to be a Raspberry Pi header in the default library of KiCad so i have made one. You can download using the links below. The only difference between the two is the additional labels on the second one. You will need to set the footprint to PinHeader_2x20_P2.54mm_Vertical if you intend to send it to a PCB fab.  Raspberry Pi GPIO header https://drive.google.com/file/d/1hKWoIRuljdQzMNbikr0GMDCznA1U268d/view?usp=sharing   Pi Header with labels https://drive.google.com/file/d/1N4BDq_Ud5GPGuW7xIAp6ljpa2xcBkQeS/view?usp=sharing  

Circuit Design KiCad

Image
  While drawing circuit diagrams with pen and paper is great for simple circuits i think i should have a look to see if there is something slightly more professional looking. I have read through a lot of sources online and decided to try KiCad. It is open source multi platform and seems to have a lot of features. Their website is https://kicad.org/ Ok so lets give it a go....Install from package manager or download for your OS and start up the suite. Create a new project and save it somewhere memorable. Click Schematic Layout Editor and we are presented with this. Lets recreate a very simple circuit voltage divider to see how it works. Add a few components, click anywhere on the page and the component selector pops up, type "R" and select resistor, click ok and place it on the page. To duplicate the resistor hover over it and press "c", place it with a left click. to delete hover over and press backspace, r rotates. Also add a battery and connect together with wires

Making a Voltage Divider For a 12V Solar System

Image
I would like to measure the charge state of a 12V solar system. Unfortunately i have let the smoke out of a Pi Zero previously using an ADC that cost more than the Pi, whoopsy. A separate ADC is required as the Pi does not have any analogue inputs. This time I have decided to design my own using a voltage divider circuit to scale down the reading to a level that can be read by a Arduino Nano that has a maximum 5V input. First thing first, calculations. The formula for a voltage divider is: Vout = (R2 / R1 + R2) x Vin Our Vin will be the battery maximum voltage, when charging this should be around 14.7V but i have seen the cheap charge controller spike to 15V. Just to be safe i am going to say 16V. Vout needs to be less than 5V. I have a box of resistors so i am going to use common values for R1 and R2. I know that if R1 and R2 are the same the Output will be half the input across each resistor so i settled on R1 = 10 and R2 =4.7. Vout = (4.7/10+4.7)x16 Vout = (4.7/14.7)x16 Vout = 0.319

PiZero Install OS and configure.

Image
Installing Raspbian Raspberry Pi OS and configure basic settings. I have a few Raspberry Pi around the house. One Pi3 runs PiHole and MySql, a Pi4 controls a 3d printer and a PiZeroW monitors the water feature and turns on the heater if it gets a bit cold..... Before you start doing any of this you will need to install the OS and get your Pi connected to your network. In this example I will use a PiZeroW, note the W ! it means that it has WiFi, this version only costs around £14 with a pre-soldered header (my soldering is rubbish :) from Pimoroni UK or Pi Hut etc. Parts Required: Raspberry Pi with WiFi Micro SD Card 8GB min, 16GB + recommended. Micro SD Card adapter to connect to your PC. Notes on the microSD card. Please do not buy the cheapest you can find, you may experience hard to trace errors, poor performance or data loss with a sub standard part. From experience I recommend the SanDiskULTRA, Class 10, A1, 32GB. It can be found online for around £5 and is at the time or writing

Intro and Welcome

Image
Hi :) My name is Leah. I like making stuff.. lots of stuff... from mittens to a water feature to remote temperature monitors and solar powered systems. Basically I like learning new things and keeping my mind occupied. This blog will be a record of things that I make with enough details to allow others to copy or customise and create their own things. It may also include code, computer projects and electronics. In my day job I am a technical services manager, network admin and copier & large format engineer. I have experience with html, php, mySql, python, MS Server including Exchange and Client OS, Linux Mint, Raspbian etc... Hope you find something helpful :) Oh and this is Rosetta, our rescue cat. We think she is around 11 years old but nobody knows for sure. She has lived with 4 families over her life but now that she is with us she has found her forever home. She will be making frequent appearances as she loves company and being in the way :p