PiZero Install OS and configure.
Installing Raspbian Raspberry Pi OS and configure basic settings.
I have a few Raspberry Pi around the house. One Pi3 runs PiHole and MySql, a Pi4 controls a 3d printer and a PiZeroW monitors the water feature and turns on the heater if it gets a bit cold.....
Before you start doing any of this you will need to install the OS and get your Pi connected to your network. In this example I will use a PiZeroW, note the W ! it means that it has WiFi, this version only costs around £14 with a pre-soldered header (my soldering is rubbish :) from Pimoroni UK or Pi Hut etc.
Parts Required:
- Raspberry Pi with WiFi
- Micro SD Card 8GB min, 16GB + recommended.
- Micro SD Card adapter to connect to your PC.
Ok on to the steps...
- Download and install Raspberry Pi OS Imager for your OS. I am using Linux Mint but the process is similar for Windows and Mac.
- Insert / connect the SD card to your computer.
- Run Raspberry Pi Imager.
- Select your OS, I use the default Raspberry Pi with Desktop.
- Select your SD card.
- Click write.
- It takes around 5 minutes to download and copy on my old laptop.......
- Rosetta is sleeping next to the warm fan output....
- Click continue once finished but leave the card in.
- Now we need to pre-configure the WiFi details. To do this we create a file in the boot mount (not rootfs as shown in the image) of the SD card called "wpa_supplicant.conf" and open it with a text editor such as nano or notepad.
- Enter the following into the file customising it to your requirements :
country=UK
ctrl_interface=DIR=/var/run/wpa_supplicant GROUP=netdev
update_config=1
network={
ssid="SSID"
scan_ssid=1
psk="PASSWORD"
key_mgmt=WPA-PSK
} - Important notes! The country should be set to your location UK, US, ES, FR etc. SSID is the name of your WiFi network, it needs the "" quotes around it. Password is your WiFi password again with "" quotes around it. Indentation is required, there are four spaces in the SSID line and two in the lines below, the image shows it better.
- In order to access the Pi we need to enable SSH. To do this simply create an empty file in the SSD boot mount called "ssh". eg. on linux command line, cd to the correct path and type "sudo touch ssh" enter. .
- The default hostname is "raspberrypi" if you are happy with this skip this step. I you want / need to change it you can edit the "hostname" file in the "etc" folder. Just replace the content with the hostname you require and save.
- Unmount / eject the SD card and insert into your Pi.
- Connect a power supply and wait 60 seconds. You should now be able to "ping" the hostname you previously entered.
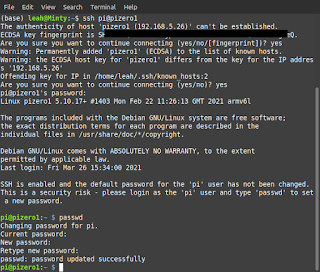
- You can SSH into the pi using "pi@hostname" or using putty on Windows. Default username is "pi" and password is "raspberry".
- One more VERY IMPORTANT THING...once logged in via SSH change the password, it gives you instructions once you are logged in but just in case.. enter "passwd" and follow the prompts :)


Comments
Post a Comment